Ref

https://help.ubuntu.com/community/HighlyAvailableNFS


HighlyAvailableNFS - Community Help Wiki

Introduction In this tutorial we will set up a highly available server providing NFS services to clients. Should a server become unavailable, services provided by our cluster will continue to be available to users. Our highly available system will resemble

help.ubuntu.com


Add hosts and install packages on each nodes

# vi /etc/hosts

[IPADDR1]    nfs1
[IPADDR2]    nfs2

# sudo apt-get install ntp drbd8-utils heartbeat

Create drbd config named 'nfs' on each nodes

# vi /etc/drbd.d/nfs.res
resource nfs {
        protocol C;

        handlers {
                pri-on-incon-degr "echo o > /proc/sysrq-trigger ; halt -f";
                pri-lost-after-sb "echo o > /proc/sysrq-trigger ; halt -f";
                local-io-error "echo o > /proc/sysrq-trigger ; halt -f";
                outdate-peer "/usr/lib/heartbeat/drbd-peer-outdater -t 5";
        }

        startup {
                degr-wfc-timeout 120;
        }

        disk {
                on-io-error detach;
                no-disk-flushes ;
                no-disk-barrier;
                c-plan-ahead 0;
                c-fill-target 1M;
                c-min-rate 180M;
                c-max-rate 720M;
        }

        net {
                cram-hmac-alg sha1;
                shared-secret "PASSWORD";
                after-sb-0pri disconnect;
                after-sb-1pri disconnect;
                after-sb-2pri disconnect;
                rr-conflict disconnect;
                max-buffers 40k;
                sndbuf-size 0;
                rcvbuf-size 0;
        }

        syncer {
                rate 210M;
                verify-alg sha1;
                al-extents 3389;
        }

        on nfs1 {
                device  /dev/drbd0;
                disk    /dev/sdb1;
                address IP:7788;
                meta-disk internal;
        }

        on nfs2 {
                device  /dev/drbd0;
                disk    /dev/sdb1;
                address IP:7788;
                meta-disk internal;
        }
}

Setup DRBD on each nodes

# sudo chgrp haclient /sbin/drbdsetup
# sudo chmod o-x /sbin/drbdsetup
# sudo chmod u+s /sbin/drbdsetup
# sudo chgrp haclient /sbin/drbdmeta
# sudo chmod o-x /sbin/drbdmeta
# sudo chmod u+s /sbin/drbdmeta

# sudo drbdadm create-md nfs

Master node

# sudo drbdadm -- --overwrite-data-of-peer primary nfs

Check Primary/Secondary state and sync progress

# cat /proc/drbd

After sync completed on both node, configure NFS

Test data sync

# sudo mkfs.ext4 /dev/drdb0
# mkdir -p /srv/data
# sudo apt-get install nfs-kernel-server

Master node again

# sudo mount /dev/drbd0 /srv/data
# sudo mv /var/lib/nfs/ /srv/data/
# sudo ln -s /srv/data/nfs/ /var/lib/nfs
# sudo mv /etc/exports /srv/data
# sudo ln -s /srv/data/exports /etc/exports

Slave node

# sudo rm -rf /var/lib/nfs
# sudo ln -s /srv/data/nfs/ /var/lib/nfs
# sudo rm /etc/exports
# sudo ln -s /srv/data/exports /etc/exports

Configure HEARTBEAT on both node

# vi /etc/heartbeat/ha.cf
logfacility local0
keepalive 2
deadtime 30
warntime 10
initdead 120
bcast enp1s0f0np0
node nfs1
node nfs2


# sudo vi /etc/heartbeat/authkeys

auth 3
3 md5 PASSWORD


# sudo chmod 600 /etc/heartbeat/authkeys
# vi /etc/heartbeat/haresources

nfs1 IPaddr::NFS_MASTER_IP/17/IF_NAME drbddisk::nfs Filesystem::/dev/drbd0::/srv/data::ext4 nfs-kernel-server


# sudo systemctl enable heartbeat

# sudo systemctl enable drbd

# sudo reboot now

Copy lxd container from local lxd host to remote lxd server

Setup remote LXD on local

lxc remote add REMOTE_NAME REMOTE_IP
lxc config set core.https_address REMOTE_IP:8443
lxc config set core.trust_password PASSWORD_STRING

Copy container

You should stop the container that you want to copy

lxc copy CONTAINER_NAME_ON_LOCAL REMOTE_NAME:CONTAINER_REMOTE_NAME


Ref

https://github.com/geofront-auth/geofront


geofront-auth/geofront

Simple SSH key management service. Contribute to geofront-auth/geofront development by creating an account on GitHub.

github.com

Colonize automation for geofront server

# colonize.py
import os
import json

# create public key
create_pub_key = os.popen("ssh-keygen -y -f /var/lib/geofront/id_rsa > /var/lib/geofront/id_rsa.pub").read()

# load server list
with open("/opt/geofront/server/server.json", 'r') as f:
        ds = json.load(f)

hosts = list()
for k, v in ds.items():
        hosts.append(k)

# get password from env variable
pw = os.environ['PASSWORD']

# start coping to remote authorized_key
for host in hosts:
        remote = ds[host]["account"]+"@"+ds[host]["ip"]
        try:
                cmd = "sh /ssh-copy-id.sh " + remote + " " + pw
                print("Executing ssh-copy-id on: " + host)
                exec_cmd = os.popen(cmd).read()
        except:
                e = os.popen("echo "+remote+" >> /failed_ssh_host.log").read()
                print("Exception error: check /failed_ssh_host.log")

date = os.popen("date").read()


# ssh-copy-id.sh
#!/bin/bash
remote=$1
pw=$2

# spawn & expect: enter for command line interaction
#spawn ssh-copy-id -o StrictHostKeyChecking=no -i /var/lib/geofront/id_rsa.pub $remote
expect << EOF
spawn ssh-copy-id -i /var/lib/geofront/id_rsa.pub $remote
expect {
    "(yes/no)?" { send "yes\n"; exp_continue }
    "password:" { send "$pw\n"; exp_continue }
    eof
}

Ref

https://prometheus.io/docs/guides/cadvisor/

https://prometheus.io/docs/guides/node-exporter/


cAdvisor: metric agent for docker swarm cluster

Node_exporter: metric agent for linux host

Prometheus

Server for collecting metric from each agents

config

configure prometheus scraping jobs

prometheus.yml
...
- job_name: 'dsg-container'
        scrape_interval: 60s
        static_configs:
        - targets: ['192.168.0.2:8080', '192.168.0.3:8080']

      - job_name: 'dsg-node_exporter'
        scrape_interval: 60s
        static_configs:
        - targets: ['192.168.0.2:9100', '192.168.0.3:9100']

Docker swarm

Deploy metric agent on the cluster

cAdvisor

cadvisor port number: 8080

# docker command should be executed on the manager node
# docker command for deploy cadvisor container on each nodes
docker service create --name cadvisor --mode=global --publish target=8080,mode=host --mount type=bind,src=/var/run/docker.sock,dst=/var/run/docker.sock,ro --mount type=bind,src=/,dst=/rootfs,ro --mount type=bind,src=/var/run,dst=/var/run --mount type=bind,src=/sys,dst=/sys,ro --mount type=bind,src=/var/lib/docker,dst=/var/lib/docker,ro google/cadvisor -docker_only

Node_exporter

node exporter port number: 9100

# docker command for deploy node_exporter on each node
docker service create --name node_exporter --mode=global --publish 9100:9100 --mount type=bind,src=/,dst=/host,ro,bind-propagation=rslave quay.io/prometheus/node-exporter --path.rootfs=/host

Check each services are correctly running on each node

# docker service ls |egrep 'node_exporter|cadvisor'
[CONTAINERID]        cadvisor                                                     global              2/2                    google/cadvisor:latest                                                *:8080->8080/tcp
[CONTAINERID]        node_exporter                                                global              2/2                    quay.io/prometheus/node-exporter:latest                               *:9100->9100/tcp

Also can check with metric URLs on the web browser

- http://192.168.0.2:8080/metrics

- http://192.168.0.3:9100/metrics

Check on prometheus

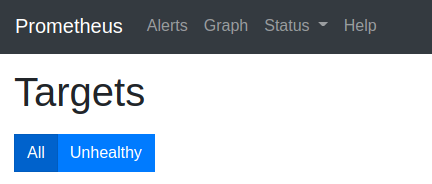
from the gui, Status > Targets can see the scraping jobs you configured before

Grafana

Create or import new dashboard

import existing dashboard from community (Grafana Labs. https://grafana.com/grafana/dashboards?pg=dashboards&plcmt=featured-sub1) 


Grafana Dashboards - discover and share dashboards for Grafana.

Grafana.com provides a central repository where the community can come together to discover and share dashboards.

grafana.com

Sample query

Sample queries for monitoring docker swarm cluster

Docker node count

count(cadvisor_version_info)

System load on each node

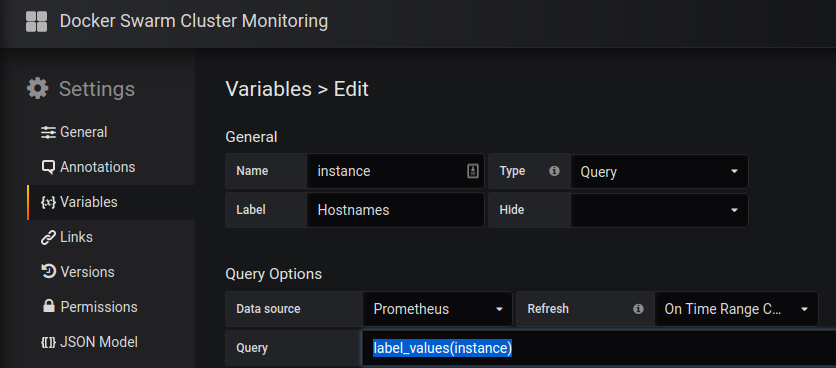
$instance: grafana variable that you can configure dashboard settings with query(label_values(instance))

node_load5{instance=~"$instance"}

Available memory on node

node_memory_MemAvailable_bytes{instance=~"$instance"}

Memory usage per container

label_replace(topk($topk, sum(container_memory_usage_bytes{container_label_com_docker_stack_namespace=~".+",container_label_com_docker_swarm_service_name =~"$service_name",container_label_com_docker_swarm_node_id=~"$node"}) by (name, container_label_com_docker_swarm_task_name)), "task_name", "$1", "container_label_com_docker_swarm_task_name", "(.*\\.[0-9]*).*\\..*")


쿠버네티스 v1.13 버전대에서 HA 구성 (마스터 노드 2개)
HA in Kubernetes v1.13

 VM 설정 및 클러스터 설정
VM settings and Configure HA cluster

Ubuntu 18.04에서 쿠버네티스 v1.13.4와 vagrant VM을 사용하여 클러스터 구축 방법을 설명합니다.

This article explains that creating kubernets cluster (v1.13.4) on Ubuntu 18.04 vagrant VM.

$ vagrant status
Current machine states:

k8s-1                     poweroff (virtualbox)
k8s-2                     poweroff (virtualbox)
k8s-3                     poweroff (virtualbox)
k8s-4                     poweroff (virtualbox)

k8s-1, k8s-2 노드 2개를 마스터 노드로, 나머지 2개를 워커 노드로 사용하는 환경입니다.

Vagrant 파일에 사용할 VM 스펙을 설정해 줍니다. network 설정 시 private을 사용해도 무방하지만 리눅스 라우팅 순서로 인해 클러스터링이 잘 묶이지 않는 이슈가 있습니다. 따라서 public으로 진행하는 것을 추천합니다.

Vagrant 파일에 쿠버네티스 클러스터에 필요한 구성요소 설치 과정이 포함되어 있습니다.


There are two master nodes (k8s-1 and k8s-2) and two worker nodes.

Specify VMs in Vagrant file. In this case, we are going to use public network configuration for VMs. If you set up private, it's okay but the clustering would not going well. Installation process of componets like docker, kubeadm is included.

$ cat Vagrantfile 
# -*- mode: ruby -*-# vi: set ft=ruby :

# All Vagrant configuration is done below. The "2" in Vagrant.configure
# configures the configuration version (we support older styles for
# backwards compatibility). Please don't change it unless you know what
# you're doing.
Vagrant.configure("2") do |config|
  # The most common configuration options are documented and commented below.
  # For a complete reference, please see the online documentation at
  # https://docs.vagrantup.com.

  # Every Vagrant development environment requires a box. You can search for
  # boxes at https://vagrantcloud.com/search.
  config.vm.box_check_update = false
  config.vm.box = "ubuntu/bionic64"
  node_subnet = "10.254.1"
#  config.vm.network "private_network", type: "dhcp"

  (1..4).each do |i|
    config.vm.define "k8s-#{i}" do |node|
      node.vm.box = "ubuntu/bionic64"
      node.vm.hostname = "k8s-#{i}"
#      node.vm.network "private_network", ip: "#{node_subnet}.#{i+1}", virtualbox__intnet: true, gateway: "10.254.1.1"
      node.vm.network "public_network", bridge: "[Network_Interface_name]", gateway: "192.168.1.1"
      node.vm.provider "virtualbox" do |vb|
        vb.name = "k8s-#{i}"
        vb.gui = false
        vb.cpus = 2
        vb.memory = "4096"

        node.vm.provision "bootstrap", type: "shell", inline: <<-SHELL
          curl -fsSL https://download.docker.com/linux/ubuntu/gpg | sudo apt-key add -
          sudo add-apt-repository "deb [arch=amd64] https://download.docker.com/linux/ubuntu $(lsb_release -cs) stable"
          curl -s https://packages.cloud.google.com/apt/doc/apt-key.gpg | sudo apt-key add -
          sudo add-apt-repository "deb https://apt.kubernetes.io/ kubernetes-xenial main"

          sudo apt-get update
          kube_version="1.13.4-00"
          kube_cni_version="0.6.0-00"
          docker_version="18.06.1~ce~3-0~ubuntu"
          packages="${packages}
                    docker-ce=${docker_version}
                    kubernetes-cni=${kube_cni_version}
                    kubelet=${kube_version}
                    kubeadm=${kube_version}
                    kubectl=${kube_version}"
          sudo apt-get -y --allow-unauthenticated install ${packages}
          sudo usermod -aG docker vagrant
          sudo systemctl enable docker.service
          sudo apt-get -y install keepalived
          sudo systemctl enable keepalived.service
          sudo echo "#{node_subnet}.#{i + 1} k8s-#{i}" | sudo tee -a /etc/hosts
          sudo swapoff -a
       SHELL
      end
    end
  end
end

구성을 마친 뒤 VM을 실행 시킨 뒤 k8s-1 노드에 SSH로 접속한 후 keepalived를 설정 해 줍니다.

쿠버네티스 클러스터 대표 IP는 192.168.123.234 입니다. k8s-1 노드의 해당 네트워크 대역 IP를 가지고 있는 인터페이스 이름을 지정해 줍니다.

After provisioning the VMs, connect to k8s-1 first. Set up the keepalived for creating master IP of our kubernetes cluster.

k8s-1 $ sudo vi /etc/keepalived/keepalived.conf
vrrp_instance VI_123 {
    state MASTER
    interface enp0s8
    virtual_router_id 123
    priority 101
    advert_int 1
    authentication {
        auth_type PASS
        auth_pass k8stest
    }
    virtual_ipaddress {
        192.168.123.234/17
    }
}

설정을 마친 뒤 keepalived 서비스를 재시작 해 주고, status 및 대표 IP를 새로 띄웠는지 확인해 줍니다.

Restart the keepalived service and check it is working.

$sudo systemctl restart keepalived
$sudo systemctl status keepalived
$ip addr |grep global

keepalived 설정 과정을 k8s-2 노드에서도 진행해 줍니다. 이 때, 설정 파일에 priority를 낮은 숫자로, state를 BACKUP으로 설정해 줍니다.

Repeat the set up process of keepalived in k8s-2 node. You should set the priority to lower than k8s-1, and state to BACKUP.

k8s-2 $ sudo vi /etc/keepalived/keepalived.conf
vrrp_instance VI_123 {
    state BACKUP
    interface enp0s8
    virtual_router_id 123
    priority 100
    advert_int 1
    authentication {
        auth_type PASS
        auth_pass k8stest
    }
    virtual_ipaddress {
        192.168.123.234/17
    }
}

다시 k8s-1 노드로 돌아와 클러스터 설정을 진행합니다. 클러스터 생성은 다음 설정 파일을 기준으로 합니다.

Return to k8s-1, create the kubernetes cluster with kubeadm configuration file.

$ cat kubeadm-config.yml
apiVersion: kubeadm.k8s.io/v1beta1
kind: InitConfiguration
localAPIEndpoint:
  advertiseAddress: "192.168.123.234"
  bindPort: 6443
---
apiVersion: kubeadm.k8s.io/v1beta1
certificatesDir: /etc/kubernetes/pki
clusterName: kubernetes
controlPlaneEndpoint: 192.168.123.234:6443
kind: ClusterConfiguration
kubernetesVersion: v1.13.4

v1.13에서 사용하는 v1beta1 문서는 다음을 참고 했습니다.
v1beta1 docs references here.
https://godoc.org/k8s.io/kubernetes/cmd/kubeadm/app/apis/kubeadm/v1beta1


클러스터를 생성해 줍니다.

Create cluster

k8s-1 $ sudo kubeadm init --config kubeadm-config.yml

완료 후 kubectl 명령 사용을 위한 kubeconfig 설정을 진행합니다.

After creation, make kubeconfig for using kubectl.

k8s-1$ sudo mkdir $HOME/.kube
k8s-1$ sudo cp -a /etc/kubernetes/admin.conf $HOME/.kube/config
k8s-1$ sudo chown $(id -u):$(id -g) $HOME/.kube/config

kubectl을 사용해서 현재 클러스터 상태를 확인할 수 있습니다.

You can check the cluster node status with command.

$ kubectl get node -owide

Additional control plane (master node)

추가 마스터노드 설정은 k8s-2 노드에서 진행합니다. 먼저 첫번째 마스터 노드인 k8s-1 에서 클러스터 조인을 위한 명령어 및 토큰을 만듭니다.

Additional master node is k8s-2. You can print out the join command on k8s-1.

k8s-1$ sudo kubeadm token create --print-join-command

그리고 가장 중요한 인증서 복사를 진행합니다. k8s-1 노드에서 클러스터를 생성하면서 같이 만들어진 인증서 들을 k8s-2 노드에 복사해 줍니다. 일일히 복사도 가능하지만 해당 디렉토리의 인증서를 모두 복사한 뒤 필요한 파일을 제외한 나머지 인증서를 삭제해 주었습니다.

k8s-1$ sudo cp -a /etc/kubernetes/pki ./
k8s-1$ sudo rm ./pki/apiserver*
k8s-1$ sudo rm ./pki/front-proxy-client.*
k8s-1$ sudo rm ./pki/etcd/healthcheck-client.*
k8s-1$ sudo rm ./pki/etcd/peer.*
k8s-1$ sudo rm ./pki/etcd/server.*

추가 마스터노드 생성을 위한 인증서 파일은 다음과 같습니다.

This is very important part to create HA cluster. You must copy these cert files on k8s-1 to k8s-2 in same directory.

/etc/kubernetes/pki/ca.crt
/etc/kubernetes/pki/ca.key
/etc/kubernetes/pki/sa.key
/etc/kubernetes/pki/sa.pub
/etc/kubernetes/pki/front-proxy-ca.crt
/etc/kubernetes/pki/front-proxy-ca.key
/etc/kubernetes/pki/etcd/ca.crt
/etc/kubernetes/pki/etcd/ca.key

k8s-2 노드에 동을 경로에 해당 인증서들을 복사해 준 뒤 조인 커맨드를 입력합니다. 이 때, --experimental-control-plane 파라미터를 추가하여 명령어를 실행합니다.

Give --experimental-control-plane argument end of the join command. Now you can join the cluster with command without problem.

k8s-2$ sudo kubeadm join 192.168.123.234:6443 --token TOEKN.TOKEN --discovery-token-ca-cert-hash sha256:HASHES --experimental-control-plane

Worker nodes

남은 워커 노드들은 추가 파라미터 없이 조인 커맨드를 입력해 줍니다.

Other worker nodes could join with join command without additional argument.

k8s-3$ sudo kubeadm join 192.168.123.234:6443 --token TOEKN.TOKEN --discovery-token-ca-cert-hash sha256:HASHES

Network plugin

클러스터에 파드를 배포하고 서비스를 하기 위해서는 네트워크 플러그인 설치가 필요합니다.

Network plugin must be installed for services.

Weavenet CNI

master-node$ kubectl apply -f "https://cloud.weave.works/k8s/net?k8s-version=$(kubectl version | base64 | tr -d '\n')"

Kubernetes Dashboard

쿠버네티스 버전에 맞는 대시보드를 설치합니다.

You can check the kubernetes and dashboard compatibility on this link.

github.com/kubernetes/dashboard/releases?after=v2.0.0-beta7


kubernetes/dashboard

General-purpose web UI for Kubernetes clusters. Contribute to kubernetes/dashboard development by creating an account on GitHub.

github.com


How to restart Jenkins server safely or not.

젠킨스 서버 재시작 방법

Instructions

In GUI Jenkins home.
GUI 환경에서 웹 브라우저를 통해 진행

  1. In the web browser: Type http://[JENKINS_HOST]/[safeRestart|restart]

  2. Click OK


References

https://stackoverflow.com/questions/8072700/how-to-restart-jenkins-manually

Curator is tool for managing ES indices.
큐레이터는 엘라스틱서치 인덱스 관리 툴이다.


Installation and configuration

You need to check your Elasticsearch version compatible with curator version.

운영중인 엘라스틱 서치 버전과 큐레이터 버전을 맞춰 주어야 한다.


설치는 pip를 이용하며, 설정 파일은 yml 형식으로 작성한다.

# in the ES master node, ES version 6+
$ pip install -U elasticsearch-curator==5.8.1

# create curator config file
# logging is optional
$ vi ~/.curator/curator.yml
---
client:
  hosts:
    - [ES_IP]
  port: [ES_PORT]
logging:
  loglevel: INFO
  logfile: /[PATH_TO_LOGFILE]/curator.log
  logformat: default
# create curator action yaml file
$ vi delete-old-indices.yml
---

actions:
  1:
    action: delete_indices
    description: >-
      Delete indices older than 1 months (based on index name), for logstash-
      prefixed indices. Ignore the error if the filter does not result in an
      actionable list of indices (ignore_empty_list) and exit cleanly.
    options:
      ignore_empty_list: True
      disable_action: False
    filters:
    - filtertype: age
      source: name
      direction: older
      timestring: '%Y.%m.%d'
      unit: months
      unit_count: 1

CLI execution

# execute curator command (--dry-run: verbose and execute action without changes)
curator --dry-run delete-old-indices.yml

AWX에서 Job 실행 후, Inventory sync 과정에서 계속 fail status를 뱉었다. 에러 메시지는 다음과 같다.

Inventory sync keep failing when the job is launched on AWX. The error message is

ERROR! Attempting to decrypt but no vault secrets found

해당 에러는 AWX 프로젝트 내에서 사용하는 ansible SCM 내에 vault 파일을 포함하고 있을 경우 발생한다. Job template 생성 시 AWX상에서 Vault 타입의 Credential을 생성하고 추가 해 주면 해결이 되어야 하는데, 정상적으로 적용하지 못하는 것으로 보인다.

SCM 내에 vault 파일을 모두 삭제해 버리는 것도 방법이다. SCM이 잘 보호 되고 있다는 가정 하에, vault password 파일과 ansible.cfg 파일을 설정하면 해결 가능하다.


That error messages comes with if the SCM in AWX project that have some vault files with no vault passwords are given. In the Job template settings, we can set the credential of vault type. But now, it is not working correctly when the job is launched. The temporary way to fix it is set up the vault password file and ansible configuration file in your SCM.

# ansible.cfg
# If set, configures the path to the Vault password file as an alternative to
# specifying --vault-password-file on the command line.
vault_password_file = ./.vault.txt


+ Recent posts